Мы уже знаем, какие удивительные Quickblox SDK обладает всеми уже имеющимися удобными функциями, такими как отправка текстовых сообщений и сообщений с вложениями, статус набора текста, статус чтения сообщения, push-уведомления, поддержка частных/общедоступных/групповых чатов и многое другое.
В этой статье мы рассмотрим, как мы можем расширить существующие функции, чтобы создать интересные функции, такие как опросы и опросы.
n 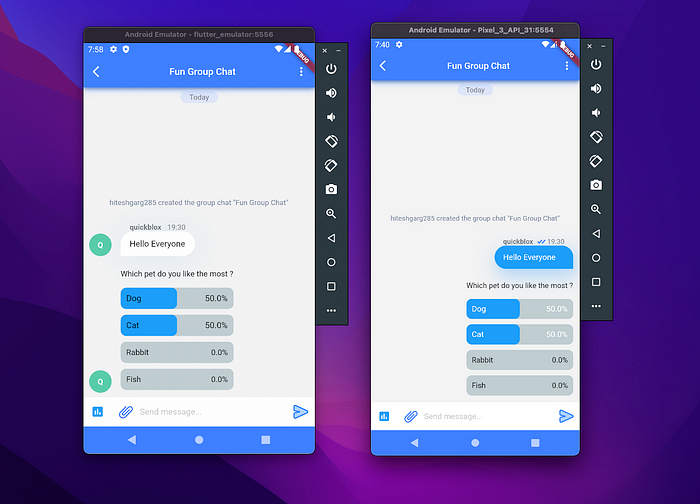
Вот указатель разделов, которые мы будем рассматривать. Пожалуйста, не стесняйтесь пропускать некоторые или читать до конца, чтобы получить максимальную пользу. 😃
* Начиная * Пользовательские объекты и модели данных Quickblox * Написание логики для поддержки опросов. * Создание пользовательского интерфейса * Сочетание всего * Дальнейшие действия
Начало работы
В этом разделе рассказывается о настройке приложения-шаблона, в котором мы можем приступить к созданию функций опросов. Мы взяли часть кода из официального приложения chat_sample Quickblox, чтобы быстро начать работу с экраном чата.
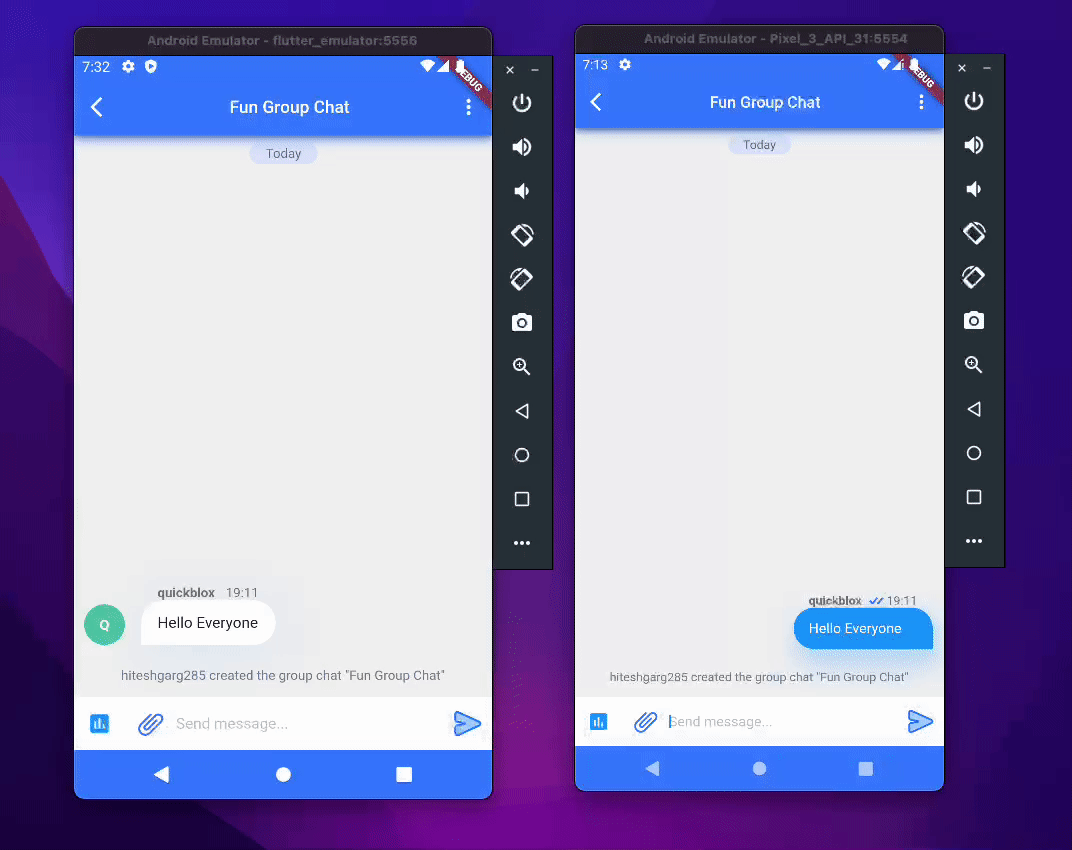
Для простоты этой статьи у нас есть только 3 экрана. Экран заставки, входа и чата. Мы также жестко закодировали _dialogId на экране чата, чтобы сразу переходить к нужному групповому чату.
Код шаблона приложения можно найти здесь. р>
Первоначальная настройка
- Создайте новую учетную запись по этой ссылке. Для входа также можно использовать свои аккаунты Google или GitHub.
- Создайте приложение, нажав кнопку Новое приложение.
- Настройте свое приложение. Введите информацию о своей организации в соответствующие поля и нажмите кнопку Добавить.
- Перейти к панели инструментов => ВАШЕ_ПРИЛОЖЕНИЕ => раздел Обзор и скопируйте идентификатор приложения, ключ авторизации, секрет авторизации и ключ учетной записи.
После получения учетных данных приложения их можно вставить в файл main.dart, который присутствует в шаблоне приложения.
n Если вы правильно выполнили описанные выше шаги, теперь вы можете запустить приложение, используя следующие команды:
flutter packages get
flutter run
Вуаля! Теперь у вас должно быть запущено базовое приложение для чата.
Пользовательские объекты и модели данных Quickblox
В этом разделе мы сначала рассмотрим модели данных, предоставляемые Quickblox, а затем создадим на их основе собственные модели для расширения функциональных возможностей и создания опросов.
Давайте начнем с понимания моделей данных, предоставляемых Quickblox.
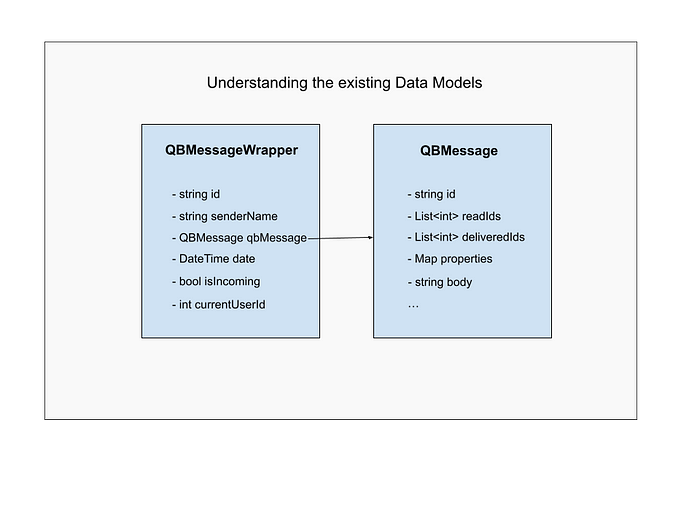
QBMessage — это объект данных по умолчанию, предоставляемый Quickblox, который хранит идентификатор (идентификатор сообщения), тело (текстовое сообщение), свойства (дополнительные метаданные) и т. д.
В этом проекте мы также создали QBMessageWrapper, который представляет собой оболочку вокруг QBMessage с дополнительными полями, такими как senderName, дата и т. д., которые пригодятся для отображения данных сообщений на экране чата.
Хотя QBMessage с его параметром properties отлично подходит для отображения статических текстовых сообщений, местоположения, веб-ссылки и т. д., его нельзя использовать для размещения интерактивных опросов, которые со временем обновляются.
Для этого Quickblox предоставляет нам Пользовательские объекты которая в основном представляет собой базу данных с настраиваемой схемой, которая может обновляться в режиме реального времени и, следовательно, идеально подходит для проведения опросов.
Чтобы настроить его, перейдите на нашу панель инструментов Quickblox > Пользовательский > Добавить > Добавьте новый класс и подготовьте собственный класс схемы Опрос, как показано ниже.
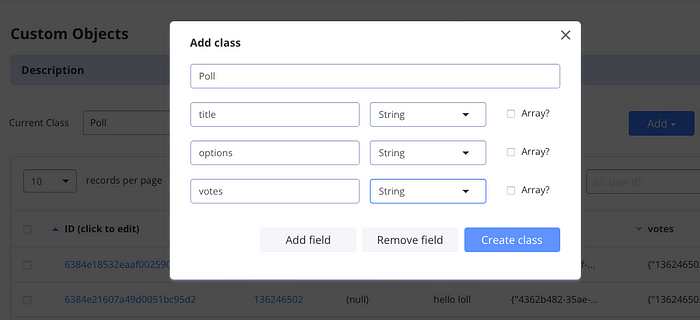
После создания откройте Изменить разрешение и измените уровень разрешений и установите флажки следующим образом.

:::информация Без открытых разрешений пользователи не могут обновлять значения опроса из приложения.
:::
В коде мы создадим два класса
* PollActionCreate для хранения опроса title и options. Мы используем пакет uuid для создания и присвоения уникального идентификатора каждому значению параметра. toJson возвращает сопоставленные значения, необходимые в соответствии с нашей схемой объекта Poll.
* PollActionVote сохраняет pollID, существующие голоса и choosenOption для currentUser . У него есть геттер updatedVotes, который пересчитывает голосование с выбранным пользователем параметром и возвращает окончательные значения.
:::информация Все значения Map закодированы jsonEncoded в строку, поскольку пользовательский объект quickblox не поддерживает тип данных Map.
:::
import 'dart:convert';
import 'package:uuid/uuid.dart';

class PollActionCreate {
  PollActionCreate({
    required this.pollTitle,
    required this.pollOptions,
  });

  final String pollTitle;
  final Map<String, String> pollOptions;

  factory PollActionCreate.fromData(
    String title,
    List<String> options,
  ) {
    const uuid = Uuid();
    return PollActionCreate(
      pollTitle: title,
      pollOptions: {for (var element in options) uuid.v4(): element},
    );
  }
  Map<String, String> toJson() {
    return {
      "title": pollTitle,
      "options": jsonEncode(pollOptions),
      "votes": jsonEncode({})
    };
  }
}

class PollActionVote {
  const PollActionVote(
      {required this.pollID,
      required this.votes,
      required this.currentUserID,
      required this.choosenOptionID});
  final String pollID;
  final Map<String, String> votes;
  final String choosenOptionID;
  final String currentUserID;

  Map<String, String> get updatedVotes {
    votes[currentUserID] = choosenOptionID;
    return {"votes": jsonEncode(votes)};
  }
}
Приведенные выше модели используются для анализа и отправки данных, но нам также нужна модель, которая пригодится, когда мы получим данные.

Мы создадим класс PollMessage, расширяющий QBMessageWrapper для хранения всех свойств, относящихся к опросу.
import 'dart:convert';

import 'package:quickblox_polls_feature/models/message_wrapper.dart';
import 'package:quickblox_sdk/models/qb_custom_object.dart';
import 'package:quickblox_sdk/models/qb_message.dart';

class PollMessage extends QBMessageWrapper {
  PollMessage(super.senderName, super.message, super.currentUserId,
      {required this.pollID,
      required this.pollTitle,
      required this.options,
      required this.votes});

  final String pollID;
  final String pollTitle;
  final Map<String, String> options;
  final Map<String, String> votes;

  factory PollMessage.fromCustomObject(String senderName, QBMessage message,
      int currentUserId, QBCustomObject object) {
    return PollMessage(senderName, message, currentUserId,
        pollID: message.properties!['pollID']!,
        pollTitle: object.fields!['title'] as String,
        options: Map<String, String>.from(
            jsonDecode(object.fields!['options'] as String)),
        votes: Map<String, String>.from(
            jsonDecode(object.fields!['votes'] as String)));
  }
  PollMessage copyWith({Map<String, String>? votes}) {
    return PollMessage(senderName!, qbMessage, currentUserId,
        pollID: pollID,
        pollTitle: pollTitle,
        options: options,
        votes: votes ?? this.votes);
  }
}
Написание логики для поддержки опросов.
Давайте начнем с этого раздела и займемся тем, что мы (как программисты) любим делать — построим логику. 😉
В этом разделе мы напишем логику создания опроса и голосования в нем, используя созданный пользователем объект Poll и параметр properties обычного сообщения. .
Мы используем шаблон блока, где в нашей логике мы получаем CreatePollMessageEvent и VoteToPollEvent от интерфейса пользовательского интерфейса, который должен инициировать вызов репозитория, который взаимодействует с серверами Quickblox.
if (receivedEvent is SendMessageEvent) {
 // SOME PRE WRITTEN CODE PRESENT HERE.
}
if (receivedEvent is CreatePollMessageEvent) {
  try {
    await _chatRepository.sendStoppedTyping(_dialogId);
    await Future.delayed(const Duration(milliseconds: 300), () async {
      await _sendCreatePollMessage(data: receivedEvent.data);
    });
  } on PlatformException catch (e) {
    states?.add(
      SendMessageErrorState(
        makeErrorMessage(e),
        'Can't create poll',
      ),
    );
  } on RepositoryException catch (e) {
    states?.add(SendMessageErrorState(e.message, 'Can't create poll'));
  }
}
if (receivedEvent is VoteToPollEvent) {
  try {
    await _chatRepository.sendStoppedTyping(_dialogId);
    await Future.delayed(const Duration(milliseconds: 300), () async {
      await _sendVotePollMessage(data: receivedEvent.data);
    });
  } on PlatformException catch (e) {
    states?.add(
      SendMessageErrorState(
        makeErrorMessage(e),
        'Can't vote poll',
      ),
    );
  } on RepositoryException catch (e) {
    states?.add(SendMessageErrorState(e.message, 'Can't vote poll'));
  }
}

Future<void> _sendCreatePollMessage({required PollActionCreate data}) async {
  await _chatRepository.sendCreatePollMessage(
    _dialogId,
    data: data,
  );
}

Future<void> _sendVotePollMessage({required PollActionVote data}) async {
  await _chatRepository.sendVotePollMessage(
    _dialogId,
    data: data,
  );
}
В chat_repository.dart, наряду с нашей простой функцией sendMessage для текстовых сообщений, мы также добавим следующие функции:
sendCreatePollMessage: регистрирует запись опроса, а возвращенныйpollIDзатем отправляется в метаданных сообщения чата. Позже мы можем использовать pollID для получения данных опроса.
Future<void> sendCreatePollMessage(String? dialogId,
      {required PollActionCreate data}) async {
    if (dialogId == null) {
      throw RepositoryException(_parameterIsNullException,
          affectedParams: ["dialogId"]);
    }

    ///Creates the poll record and returns a single custom object
    final List<QBCustomObject?> pollObject =
        await QB.data.create(className: 'Poll', fields: data.toJson());
    final pollID = pollObject.first!.id!;

    ///Sends an empty text message without body with the poll action and ID
    await QB.chat.sendMessage(
      dialogId,
      saveToHistory: true,
      markable: true,
      properties: {"action": "pollActionCreate", "pollID": pollID},
    );
  }
sendVotePollMessage: обновляет запись опроса последними значениями голосов. В параметре fields должны быть отправлены только те поля, которые нужно обновить, что для нас равноvotes.
Обратите внимание, что здесь saveToHistroy не включен для sendMessage, поскольку единственной целью sendMessage здесь является уведомление текущих клиентов об обновлении значений опроса.
В будущем, когда мы снова откроем чаты, извлеченные значения опроса уже будут самыми последними, что исключает необходимость в сообщении pollActionVote в истории.
:::информация Важное примечание: saveToHistroy следует использовать с умом. В противном случае, для больших групп из более чем 100 человек, мы можем несколько раз пролистать страницы только для того, чтобы найти серию бесполезных сообщений pollActionVote.
:::
  Future<void> sendVotePollMessage(String? dialogId,
      {required PollActionVote data, required String currentUserID}) async {
    if (dialogId == null) {
      throw RepositoryException(_parameterIsNullException,
          affectedParams: ["dialogId"]);
    }
    ///Updates the updated Votes value in the poll record.
    await QB.data.update("Poll", id: data.pollID, fields: data.updatedVotes);

    ///Sends a message to notify clients
    await QB.chat.sendMessage(
      dialogId,
      markable: true,
      properties: {"action": "pollActionVote", "pollID": data.pollID},
    );
  }
3. getCustomObject: используется для получения последнего состояния данных опроса.
  Future<List<QBCustomObject?>?> getCustomObject(
      {required List<String> ids, required String className}) {
    return QB.data.getByIds("Poll", ids);
  }
Чтобы узнать больше о таких параметрах, как markable и saveToHistory, вы можете обратиться к замечательным документам Quickblox.
Таким образом, из chat_screen_bloc.dart мы в основном вызываем эти три метода только из репозитория и заключаем их в блоки try-catch, чтобы поймать и сформулировать правильную ошибку, если что-то пойдет не так.
:::информация Примечание. Возможно, вы уже заметили, что перед вызовом этих методов мы также вызываем метод sendStoppedTyping из репозитория чата, чтобы убедиться, что пользовательский интерфейс на стороне получателя не показывает, что мы больше печатаем.< /p>
:::
Фууу!! Итак, мы почти закончили (подождите, опять почти? 😟) n Ну, осталось еще кое-что. Угадайте, чего нам не хватает? 🤔 Что происходит, когда мы получаем новое сообщение? Куда это пойдет? Как это будет обрабатываться, если это опрос или голосование за опрос? Давайте разберемся с этим.

Итак, в файле chat_screen_bloc у нас есть HashSet<QBMessageWrapper> _wrappedMessageSet, в котором хранятся все сообщения, отсортированные по времени.
У нас также есть метод _wrapMessages(), который вызывается каждый раз, когда мы получаем новые сообщения, и отвечает за перенос QBMessage(-ов) в List< QBMessageWrappers>. Теперь мы обновим этот метод для обработки входящих сообщений pollActionCreate и pollActionVote.
При получении:
pollActionCreate: сначала мы извлекаемpollIDизсвойствсообщения, а затем используемgetCustomObjectдля получения запись опроса и создание объектаPollMessage.
2. pollActionVote: дает нам идентификатор опроса, который был обновлен. Затем мы используем pollID для получения последних значений голосования и обновления предыдущего объекта PollMessage.
///Called whenever new messages are received.
Future<List<QBMessageWrapper>> _wrapMessages(
      List<QBMessage?> messages) async {
    List<QBMessageWrapper> wrappedMessages = [];
    for (QBMessage? message in messages) {
      if (message == null) {
        break;
      }

      QBUser? sender = _getParticipantById(message.senderId);
      if (sender == null && message.senderId != null) {
        List<QBUser?> users =
            await _usersRepository.getUsersByIds([message.senderId!]);
        if (users.isNotEmpty) {
          sender = users[0];
          _saveParticipants(users);
        }
      }
      String senderName = sender?.fullName ?? sender?.login ?? "DELETED User";
      ///Fetch the latest poll object data using the pollID
      ///and update the PollMessage object with the new vote values
      if (message.properties?['action'] == 'pollActionVote') {
        final id = message.properties!['pollID']!;
        final pollObject =
            await _chatRepository.getCustomObject(ids: [id], className: "Poll");
        final votes = Map<String, String>.from(
            jsonDecode(pollObject!.first!.fields!['votes'] as String));
        final pollMessage = _wrappedMessageSet.firstWhere(
                (element) => element is PollMessage && element.pollID == id)
            as PollMessage;
        _wrappedMessageSet.removeWhere(
            (element) => element is PollMessage && element.pollID == id);
        wrappedMessages.add(pollMessage.copyWith(votes: votes));

       ///Fetch the poll object associated with the pollID and save
       ///it as a PollMessage in the list.
      } else if (message.properties?['action'] == 'pollActionCreate') {
        final pollObject = await _chatRepository.getCustomObject(
            ids: [message.properties!['pollID']!], className: "Poll");
        final poll = PollMessage.fromCustomObject(
            senderName, message, _localUserId!, pollObject!.first!);

        wrappedMessages.add(poll);
      } else {
        wrappedMessages
            .add(QBMessageWrapper(senderName, message, _localUserId!));
      }
    }

    ///This list returned is then appended to _wrappedMessageSet
    return wrappedMessages;
  }
Все сообщения, обычные и опросные, теперь добавляются в список _wrappedMessageSet и могут отображаться в пользовательском интерфейсе.
Создание пользовательского интерфейса
Итак, у нас есть готовые модели данных, у нас есть готовая логика опросов. Теперь давайте сосредоточимся на создании красивого пользовательского интерфейса для нашей функции опросов.
:::информация Примечание. Наш пользовательский интерфейс опросов в значительной степени основан на пакете polls. Чтобы настроить его в соответствии с нашими потребностями, мы решили добавить код вручную и внесли изменения.
:::
Прежде всего, мы знаем, что каждый вариант опроса будет иметь уникальный идентификатор (как мы уже упоминали ранее), чтобы однозначно идентифицировать его. вариант. (Вы знаете, куда клонится 😉, да! Еще одна модель, но, поверьте, простенькая.)
Поэтому создайте новый файл polls.dart для хранения всего, что связано с пользовательским интерфейсом опросов. Создадим в файле модель PollOption.
class PollOption {
  String? optionId;
  String option;
  double value;

  PollOption({
    this.optionId,
    required this.option,
    required this.value,
  });
}
Теперь, в самом основании, нам в основном понадобятся 2 виджета. Один представляет непроголосованное состояние, а другой - проголосовавший.
n Это означает, что у нас также будет логическое значение, чтобы проверить, проголосовал человек или нет. Итак, давайте начнем с создания виджета с состоянием и набором параметров.
class Polls extends StatefulWidget {
  Polls({
    required this.children,
    required this.pollTitle,
    this.hasVoted,
    this.onVote,
    Key? key,
  }) : super(key: key);

  final Text pollTitle;
  final bool? hasVoted;
  final PollOnVote? onVote;
  List<PollOption> children;

  @override
  PollsState createState() => PollsState();
}

class PollsState extends State<Polls> {
@override
  Widget build(BuildContext context) {
    if (!hasVoted) {
      //user can cast vote with this widget
      return voterWidget(context);
    } else {
      //user can view his votes with this widget
      return voteCasted(context);
    }
  }

  /// voterWidget creates view for users to cast their votes
  Widget voterWidget(context) {
      return Container();
  }

  /// voteCasted created view for user to see votes they casted including other peoples vote
  Widget voteCasted(context) {
      return Container();
  }
}

typedef PollOnVote = void Function(
  PollOption pollOption,
  int optionIndex,
);
Это было просто, верно? Теперь мы собираемся добавить код пользовательского интерфейса для voterWidget и виджета voteCasted. Это просто простые строки и столбцы с некоторыми украшениями вокруг. Поэтому мы не будем слишком зацикливаться на их объяснении.
n Самое интересное еще впереди, когда мы объединим пользовательский интерфейс и логику. 😉
class Polls extends StatefulWidget {
  Polls({
    required this.children,
    required this.pollTitle,
    this.hasVoted,
    this.controller,
    this.onVote,
    this.outlineColor = Colors.blue,
    this.backgroundColor = Colors.blueGrey,
    this.onVoteBackgroundColor = Colors.blue,
    this.leadingPollStyle,
    this.pollStyle,
    this.iconColor = Colors.black,
    this.leadingBackgroundColor = Colors.blueGrey,
    this.barRadius = 10,
    this.userChoiceIcon,
    this.showLogger = true,
    this.totalVotes = 0,
    this.userPollChoice,
    Key? key,
  }) : super(key: key);

  final double barRadius;
  int? userPollChoice;

  final int totalVotes;

  final Text pollTitle;
  final Widget? userChoiceIcon;

  final bool? hasVoted;
  final bool showLogger;

  final PollOnVote? onVote;
  List<PollOption> children;
  final PollController? controller;

  /// style
  final TextStyle? pollStyle;
  final TextStyle? leadingPollStyle;

  ///colors setting for polls widget
  final Color outlineColor;
  final Color backgroundColor;
  final Color? onVoteBackgroundColor;
  final Color? iconColor;
  final Color? leadingBackgroundColor;

  @override
  PollsState createState() => PollsState();
}

class PollsState extends State<Polls> {
  PollController? _controller;

  var choiceList = <String>[];
  var userChoiceList = <String>[];
  var valueList = <double>[];
  var userValueList = <double>[];

  /// style
  late TextStyle pollStyle;
  late TextStyle leadingPollStyle;

  ///colors setting for polls widget
  Color? outlineColor;
  Color? backgroundColor;
  Color? onVoteBackgroundColor;
  Color? iconColor;
  Color? leadingBackgroundColor;

  double highest = 0.0;

  bool hasVoted = false;

  @override
  void initState() {
    super.initState();

    _controller = widget.controller;
    _controller ??= PollController();
    _controller!.children = widget.children;
    hasVoted = widget.hasVoted ?? _controller!.hasVoted;

    _controller?.addListener(() {
      if (_controller!.makeChange) {
        hasVoted = _controller!.hasVoted;
        _updateView();
      }
    });

    _reCalibrate();
  }

  void _updateView() {
    widget.children = _controller!.children;
    _controller!.revertChangeBoolean();
    _reCalibrate();
  }

  void _reCalibrate() {
    choiceList.clear();
    userChoiceList.clear();
    valueList.clear();

    /// if polls style is null, it sets default pollstyle and leading pollstyle
    pollStyle = widget.pollStyle ??
        const TextStyle(color: Colors.black, fontWeight: FontWeight.w300);
    leadingPollStyle = widget.leadingPollStyle ??
        const TextStyle(color: Colors.black, fontWeight: FontWeight.w800);

    widget.children.map((e) {
      choiceList.add(e.option);
      userChoiceList.add(e.option);
      valueList.add(e.value);
    }).toList();
  }

  @override
  Widget build(BuildContext context) {
    if (!hasVoted) {
      //user can cast vote with this widget
      return voterWidget(context);
    } else {
      //user can view his votes with this widget
      return voteCasted(context);
    }
  }

  /// voterWidget creates view for users to cast their votes
  Widget voterWidget(context) {
    return Column(
      crossAxisAlignment: CrossAxisAlignment.start,
      children: <Widget>[
        widget.pollTitle,
        const SizedBox(
          height: 12,
        ),
        Column(
          children: widget.children.map((element) {
            int index = widget.children.indexOf(element);
            return Container(
              width: double.infinity,
              padding: const EdgeInsets.only(bottom: 10),
              child: Container(
                margin: const EdgeInsets.all(0),
                width: MediaQuery.of(context).size.width / 1.5,
                padding: const EdgeInsets.all(0),
                // height: 38,
                decoration: BoxDecoration(
                  borderRadius: BorderRadius.circular(22),
                  color: widget.backgroundColor,
                ),
                child: OutlinedButton(
                  onPressed: () {
                    widget.onVote!(
                      widget.children[index],
                      index,
                    );
                  },
                  style: OutlinedButton.styleFrom(
                    foregroundColor: widget.outlineColor,
                    padding: const EdgeInsets.all(5.0),
                    side: BorderSide(
                      color: widget.outlineColor,
                    ),
                    shape: RoundedRectangleBorder(
                      borderRadius: BorderRadius.circular(widget.barRadius),
                    ),
                  ),
                  child: Text(
                    element.option,
                    style: widget.pollStyle,
                    maxLines: 2,
                  ),
                ),
              ),
            );
          }).toList(),
        ),
      ],
    );
  }

  /// voteCasted created view for user to see votes they casted including other peoples vote
  Widget voteCasted(context) {
    return Column(
      crossAxisAlignment: CrossAxisAlignment.start,
      children: <Widget>[
        widget.pollTitle,
        const SizedBox(
          height: 12,
        ),
        Column(
          children: widget.children.map(
            (element) {
              int index = widget.children.indexOf(element);
              return Container(
                margin: const EdgeInsets.symmetric(vertical: 5),
                width: double.infinity,
                child: LinearPercentIndicator(
                  padding: EdgeInsets.zero,
                  animation: true,
                  lineHeight: 38.0,
                  animationDuration: 500,
                  percent:
                      PollMethods.getViewPercentage(valueList, index + 1, 1),
                  center: Padding(
                    padding: const EdgeInsets.symmetric(horizontal: 10),
                    child: Row(
                      mainAxisAlignment: MainAxisAlignment.spaceBetween,
                      children: <Widget>[
                        Row(
                          mainAxisAlignment: MainAxisAlignment.start,
                          children: <Widget>[
                            Text(
                              choiceList[index].toString(),
                              style: highest == valueList[index]
                                  ? widget.leadingPollStyle
                                  : widget.pollStyle,
                            ),
                          ],
                        ),
                        Text(
                          "${PollMethods.getViewPercentage(valueList, index + 1, 100).toStringAsFixed(1)}%",
                          style: highest == valueList[index]
                              ? widget.leadingPollStyle
                              : widget.pollStyle,
                        )
                      ],
                    ),
                  ),
                  barRadius: Radius.circular(widget.barRadius),
                  progressColor: highest == valueList[index]
                      ? widget.leadingBackgroundColor
                      : widget.onVoteBackgroundColor,
                ),
              );
            },
          ).toList(),
        )
      ],
    );
  }
}

class PollMethods {
  static double getViewPercentage(List<double> valueList, choice, int byValue) {
    double div = 0.0;
    var slot = <double>[];
    double sum = 0.0;

    valueList.map((element) {
      slot.add(element);
    }).toList();

    valueList.map((element) {
      sum = slot.map((value) => value).fold(0, (a, b) => a + b);
    }).toList();
    div = sum == 0 ? 0.0 : (byValue / sum) * slot[choice - 1];
    return div;
  }
}

class PollController extends ChangeNotifier {
  var children = <PollOption>[];
  bool hasVoted = false;
  bool makeChange = false;

  void revertChangeBoolean() {
    makeChange = false;
    notifyListeners();
  }
}

typedef PollOnVote = void Function(
  PollOption pollOption,
  int optionIndex,
);
В приведенном выше коде мы настроили PollController, который поможет нам хранить переменные и обновлять пользовательский интерфейс при необходимости. Остальное — это стилизация виджетов.
n У нас также есть виджетLinearPercentIndicator, который в основном помогает нам заполнить необходимый процент в зависимости от количества голосов по каждому варианту. Этот виджет в основном взят из этого пакета, чтобы упростить процесс создания пользовательского интерфейса. Прикрепите код ниже.
import 'package:flutter/material.dart';

// ignore: must_be_immutable
class LinearPercentIndicator extends StatefulWidget {
  ///Percent value between 0.0 and 1.0
  final double percent;
  final double? width;

  ///Height of the line
  final double lineHeight;

  ///Color of the background of the Line , default = transparent
  final Color fillColor;

  ///First color applied to the complete line
  Color get backgroundColor => _backgroundColor;
  late Color _backgroundColor;

  ///First color applied to the complete line
  final LinearGradient? linearGradientBackgroundColor;

  Color get progressColor => _progressColor;

  late Color _progressColor;

  ///true if you want the Line to have animation
  final bool animation;

  ///duration of the animation in milliseconds, It only applies if animation attribute is true
  final int animationDuration;

  ///widget at the left of the Line
  final Widget? leading;

  ///widget at the right of the Line
  final Widget? trailing;

  ///widget inside the Line
  final Widget? center;

  ///The kind of finish to place on the end of lines drawn, values supported: butt, round, roundAll
  // @Deprecated('This property is no longer used, please use barRadius instead.')
  // final LinearStrokeCap? linearStrokeCap;

  /// The border radius of the progress bar (Will replace linearStrokeCap)
  final Radius? barRadius;

  ///alignment of the Row (leading-widget-center-trailing)
  final MainAxisAlignment alignment;

  ///padding to the LinearPercentIndicator
  final EdgeInsets padding;

  /// set true if you want to animate the linear from the last percent value you set
  final bool animateFromLastPercent;

  /// If present, this will make the progress bar colored by this gradient.
  ///
  /// This will override [progressColor]. It is an error to provide both.
  final LinearGradient? linearGradient;

  /// set false if you don't want to preserve the state of the widget
  final bool addAutomaticKeepAlive;

  /// set true if you want to animate the linear from the right to left (RTL)
  final bool isRTL;

  /// Creates a mask filter that takes the progress shape being drawn and blurs it.
  final MaskFilter? maskFilter;

  /// Set true if you want to display only part of [linearGradient] based on percent value
  /// (ie. create 'VU effect'). If no [linearGradient] is specified this option is ignored.
  final bool clipLinearGradient;

  /// set a linear curve animation type
  final Curve curve;

  /// set true when you want to restart the animation, it restarts only when reaches 1.0 as a value
  /// defaults to false
  final bool restartAnimation;

  /// Callback called when the animation ends (only if `animation` is true)
  final VoidCallback? onAnimationEnd;

  /// Display a widget indicator at the end of the progress. It only works when `animation` is true
  final Widget? widgetIndicator;

  LinearPercentIndicator({
    Key? key,
    this.fillColor = Colors.transparent,
    this.percent = 0.0,
    this.lineHeight = 5.0,
    this.width,
    Color? backgroundColor,
    this.linearGradientBackgroundColor,
    this.linearGradient,
    Color? progressColor,
    this.animation = false,
    this.animationDuration = 500,
    this.animateFromLastPercent = false,
    this.isRTL = false,
    this.leading,
    this.trailing,
    this.center,
    this.addAutomaticKeepAlive = true,
    // this.linearStrokeCap,
    this.barRadius,
    this.padding = const EdgeInsets.symmetric(horizontal: 10.0),
    this.alignment = MainAxisAlignment.start,
    this.maskFilter,
    this.clipLinearGradient = false,
    this.curve = Curves.linear,
    this.restartAnimation = false,
    this.onAnimationEnd,
    this.widgetIndicator,
  }) : super(key: key) {
    if (linearGradient != null && progressColor != null) {
      throw ArgumentError(
          'Cannot provide both linearGradient and progressColor');
    }
    _progressColor = progressColor ?? Colors.red;

    if (linearGradientBackgroundColor != null && backgroundColor != null) {
      throw ArgumentError(
          'Cannot provide both linearGradientBackgroundColor and backgroundColor');
    }
    _backgroundColor = backgroundColor ?? const Color(0xFFB8C7CB);

    if (percent < 0.0 || percent > 1.0) {
      throw Exception(
          "Percent value must be a double between 0.0 and 1.0, but it's $percent");
    }
  }

  @override
  LinearPercentIndicatorState createState() => LinearPercentIndicatorState();
}

class LinearPercentIndicatorState extends State<LinearPercentIndicator>
    with SingleTickerProviderStateMixin, AutomaticKeepAliveClientMixin {
  AnimationController? _animationController;
  Animation? _animation;
  double _percent = 0.0;
  final _containerKey = GlobalKey();
  final _keyIndicator = GlobalKey();
  double _containerWidth = 0.0;
  double _containerHeight = 0.0;
  double _indicatorWidth = 0.0;
  double _indicatorHeight = 0.0;

  @override
  void dispose() {
    _animationController?.dispose();
    super.dispose();
  }

  @override
  void initState() {
    WidgetsBinding.instance.addPostFrameCallback((_) {
      if (mounted) {
        setState(() {
          _containerWidth = _containerKey.currentContext?.size?.width ?? 0.0;
          _containerHeight = _containerKey.currentContext?.size?.height ?? 0.0;
          if (_keyIndicator.currentContext != null) {
            _indicatorWidth = _keyIndicator.currentContext?.size?.width ?? 0.0;
            _indicatorHeight =
                _keyIndicator.currentContext?.size?.height ?? 0.0;
          }
        });
      }
    });
    if (widget.animation) {
      _animationController = AnimationController(
          vsync: this,
          duration: Duration(milliseconds: widget.animationDuration));
      _animation = Tween(begin: 0.0, end: widget.percent).animate(
        CurvedAnimation(parent: _animationController!, curve: widget.curve),
      )..addListener(() {
          setState(() {
            _percent = _animation!.value;
          });
          if (widget.restartAnimation && _percent == 1.0) {
            _animationController!.repeat(min: 0, max: 1.0);
          }
        });
      _animationController!.addStatusListener((status) {
        if (widget.onAnimationEnd != null &&
            status == AnimationStatus.completed) {
          widget.onAnimationEnd!();
        }
      });
      _animationController!.forward();
    } else {
      _updateProgress();
    }
    super.initState();
  }

  void _checkIfNeedCancelAnimation(LinearPercentIndicator oldWidget) {
    if (oldWidget.animation &&
        !widget.animation &&
        _animationController != null) {
      _animationController!.stop();
    }
  }

  @override
  void didUpdateWidget(LinearPercentIndicator oldWidget) {
    super.didUpdateWidget(oldWidget);
    if (oldWidget.percent != widget.percent) {
      if (_animationController != null) {
        _animationController!.duration =
            Duration(milliseconds: widget.animationDuration);
        _animation = Tween(
                begin: widget.animateFromLastPercent ? oldWidget.percent : 0.0,
                end: widget.percent)
            .animate(
          CurvedAnimation(parent: _animationController!, curve: widget.curve),
        );
        _animationController!.forward(from: 0.0);
      } else {
        _updateProgress();
      }
    }
    _checkIfNeedCancelAnimation(oldWidget);
  }

  _updateProgress() {
    setState(() {
      _percent = widget.percent;
    });
  }

  @override
  Widget build(BuildContext context) {
    super.build(context);
    var items = List<Widget>.empty(growable: true);
    if (widget.leading != null) {
      items.add(widget.leading!);
    }
    final hasSetWidth = widget.width != null;
    final percentPositionedHorizontal =
        _containerWidth * _percent - _indicatorWidth / 3;
    var containerWidget = Container(
      width: hasSetWidth ? widget.width : double.infinity,
      height: widget.lineHeight,
      padding: widget.padding,
      child: Stack(
        clipBehavior: Clip.none,
        children: [
          CustomPaint(
            key: _containerKey,
            painter: _LinearPainter(
              isRTL: widget.isRTL,
              progress: _percent,
              progressColor: widget.progressColor,
              linearGradient: widget.linearGradient,
              backgroundColor: widget.backgroundColor,
              barRadius: widget.barRadius ??
                  Radius.zero, // If radius is not defined, set it to zero
              linearGradientBackgroundColor:
                  widget.linearGradientBackgroundColor,
              maskFilter: widget.maskFilter,
              clipLinearGradient: widget.clipLinearGradient,
            ),
            child: (widget.center != null)
                ? Center(child: widget.center)
                : Container(),
          ),
          if (widget.widgetIndicator != null && _indicatorWidth == 0)
            Opacity(
              opacity: 0.0,
              key: _keyIndicator,
              child: widget.widgetIndicator,
            ),
          if (widget.widgetIndicator != null &&
              _containerWidth > 0 &&
              _indicatorWidth > 0)
            Positioned(
              right: widget.isRTL ? percentPositionedHorizontal : null,
              left: !widget.isRTL ? percentPositionedHorizontal : null,
              top: _containerHeight / 2 - _indicatorHeight,
              child: widget.widgetIndicator!,
            ),
        ],
      ),
    );

    if (hasSetWidth) {
      items.add(containerWidget);
    } else {
      items.add(Expanded(
        child: containerWidget,
      ));
    }
    if (widget.trailing != null) {
      items.add(widget.trailing!);
    }

    return Material(
      color: Colors.transparent,
      child: Container(
        color: widget.fillColor,
        child: Row(
          mainAxisAlignment: widget.alignment,
          crossAxisAlignment: CrossAxisAlignment.center,
          children: items,
        ),
      ),
    );
  }

  @override
  bool get wantKeepAlive => widget.addAutomaticKeepAlive;
}

class _LinearPainter extends CustomPainter {
  final Paint _paintBackground = Paint();
  final Paint _paintLine = Paint();
  final double progress;
  final bool isRTL;
  final Color progressColor;
  final Color backgroundColor;
  final Radius barRadius;
  final LinearGradient? linearGradient;
  final LinearGradient? linearGradientBackgroundColor;
  final MaskFilter? maskFilter;
  final bool clipLinearGradient;

  _LinearPainter({
    required this.progress,
    required this.isRTL,
    required this.progressColor,
    required this.backgroundColor,
    required this.barRadius,
    this.linearGradient,
    this.maskFilter,
    required this.clipLinearGradient,
    this.linearGradientBackgroundColor,
  }) {
    _paintBackground.color = backgroundColor;

    _paintLine.color = progress.toString() == "0.0"
        ? progressColor.withOpacity(0.0)
        : progressColor;
  }

  @override
  void paint(Canvas canvas, Size size) {
    // Draw background first
    Path backgroundPath = Path();
    backgroundPath.addRRect(RRect.fromRectAndRadius(
        Rect.fromLTWH(0, 0, size.width, size.height), barRadius));
    canvas.drawPath(backgroundPath, _paintBackground);
    canvas.clipPath(backgroundPath);

    if (maskFilter != null) {
      _paintLine.maskFilter = maskFilter;
    }

    if (linearGradientBackgroundColor != null) {
      Offset shaderEndPoint =
          clipLinearGradient ? Offset.zero : Offset(size.width, size.height);
      _paintBackground.shader = linearGradientBackgroundColor
          ?.createShader(Rect.fromPoints(Offset.zero, shaderEndPoint));
    }

    // Then draw progress line
    final xProgress = size.width * progress;
    Path linePath = Path();
    if (isRTL) {
      if (linearGradient != null) {
        _paintLine.shader = _createGradientShaderRightToLeft(size, xProgress);
      }
      linePath.addRRect(RRect.fromRectAndRadius(
          Rect.fromLTWH(
              size.width - size.width * progress, 0, xProgress, size.height),
          barRadius));
    } else {
      if (linearGradient != null) {
        _paintLine.shader = _createGradientShaderLeftToRight(size, xProgress);
      }
      linePath.addRRect(RRect.fromRectAndRadius(
          Rect.fromLTWH(0, 0, xProgress, size.height), barRadius));
    }
    canvas.drawPath(linePath, _paintLine);
  }

  Shader _createGradientShaderRightToLeft(Size size, double xProgress) {
    Offset shaderEndPoint =
        clipLinearGradient ? Offset.zero : Offset(xProgress, size.height);
    return linearGradient!.createShader(
      Rect.fromPoints(
        Offset(size.width, size.height),
        shaderEndPoint,
      ),
    );
  }

  Shader _createGradientShaderLeftToRight(Size size, double xProgress) {
    Offset shaderEndPoint = clipLinearGradient
        ? Offset(size.width, size.height)
        : Offset(xProgress, size.height);
    return linearGradient!.createShader(
      Rect.fromPoints(
        Offset.zero,
        shaderEndPoint,
      ),
    );
  }

  @override
  bool shouldRepaint(CustomPainter oldDelegate) => true;
}
Теперь у нас есть код опросов, готовый для интеграции с нашим фактическим пользовательским интерфейсом экрана чата. Если вы перейдете к файлу chat_screen.dart, вы увидите, что каждое сообщение отображается в виде chat_list_itemвиджет.
n Итак, давайте также создадим виджет chat_poll_item, чтобы обернуть виджет «Опросы» и отображать его в соответствии с нашим chat_screen.
В том же каталоге создайте новый файл с именем chat_poll_item.dart
class ChatPollItem extends StatelessWidget {
  const ChatPollItem({
    Key? key,
  }) : super(key: key);

  @override
  Widget build(BuildContext context) {
    return Container();
}
Теперь попробуем разобраться, что нам вообще нужно в этом виджете и как мы будем рендерить опрос.
- Нам нужен объект
PollMessageCreateдля создания опроса с заголовком и параметрами. - Для подсчета и отображения общего количества голосов в опросе мы используем свойство
votesобъектаPollMessageCreate, которое представляет собой<String, String> type Сопоставление<UserID, ChoosenOptionID>. - Нам нужен
dialogTypeint, чтобы идентифицировать чат как групповой чат и построить фрейм аватара. - Нам также нужно логическое значение, если пользователь проголосовал в опросе или нет, но поскольку у нас есть список голосующих, мы можем просто проверить, содержит ли он
currentUserId.
Теперь добавим все эти параметры и соединим опросы с пользовательским интерфейсом.
import 'package:flutter/material.dart';
import 'package:provider/provider.dart';
import 'package:quickblox_polls_feature/bloc/chat/chat_screen_bloc.dart';
import 'package:quickblox_polls_feature/bloc/chat/chat_screen_events.dart';
import 'package:quickblox_polls_feature/models/poll_action.dart';
import 'package:quickblox_polls_feature/models/poll_message.dart';
import 'package:quickblox_polls_feature/presentation/screens/chat/avatar_noname.dart';
import 'package:quickblox_polls_feature/presentation/screens/chat/polls.dart';
import 'package:quickblox_sdk/chat/constants.dart';

class ChatPollItem extends StatelessWidget {
  final PollMessage message;

  final int? dialogType;

  const ChatPollItem({required this.message, this.dialogType, Key? key})
      : super(key: key);

  @override
  Widget build(BuildContext context) {
    final List<int?> voters =
        message.votes.keys.map((userId) => int.parse(userId)).toList();
    bool hasVoted = voters.contains(message.currentUserId);

    return Container(
      padding: const EdgeInsets.only(left: 10, right: 12, bottom: 8),
      child: Row(
        mainAxisSize: MainAxisSize.min,
        crossAxisAlignment: CrossAxisAlignment.end,
        children: <Widget>[
          Container(
              child: message.isIncoming && dialogType != QBChatDialogTypes.CHAT
                  ? AvatarFromName(name: message.senderName)
                  : null),
          Padding(padding: EdgeInsets.only(left: dialogType == 3 ? 0 : 16)),
          Expanded(
              child: Padding(
            padding: const EdgeInsets.only(top: 15),
            child: Column(
              crossAxisAlignment: message.isIncoming
                  ? CrossAxisAlignment.start
                  : CrossAxisAlignment.end,
              children: <Widget>[
                IntrinsicWidth(
                  child: Column(
                    crossAxisAlignment: CrossAxisAlignment.stretch,
                    children: [
                      Polls(
                        onVote: (pollOption, optionIndex) {
                          ///TODO: Explained in next section
                        },
                        pollStyle: TextStyle(
                          overflow: TextOverflow.ellipsis,
                          fontSize: 15,
                          color: message.isIncoming
                              ? Colors.black87
                              : Colors.white,
                        ),
                        backgroundColor:
                            message.isIncoming ? Colors.white : Colors.blue,
                        outlineColor: Colors.transparent,
                        hasVoted: hasVoted,
                        children: message.options.entries
                            .map((option) => PollOption(
                                optionId: option.key, //OptionID
                                option: option.value, //Option Value (Text)
                                value: message.votes.values
                                    .where((choosenOptionID) =>
                                        choosenOptionID == option.key)
                                    .length
                                    .toDouble()))
                            .toList(),
                        pollTitle: Text(
                          message.pollTitle,
                        ),
                      ),
                    ],
                  ),
                ),
              ],
            ),
          ))
        ],
      ),
    );
  }
}

class AvatarFromName extends StatelessWidget {
  const AvatarFromName({
    Key? key,
    String? name,
  })  : _name = name ?? "Noname",
        super(key: key);

  final String _name;

  @override
  Widget build(BuildContext context) {
    return Container(
      width: 40,
      height: 40,
      decoration: BoxDecoration(
        color: Color(ColorUtil.getColor(_name)),
        borderRadius: const BorderRadius.all(
          Radius.circular(20),
        ),
      ),
      child: Center(
        child: Text(
          _name.substring(0, 1).toUpperCase(),
          style: const TextStyle(
            color: Colors.white,
            fontWeight: FontWeight.bold,
          ),
        ),
      ),
    );
  }
}
Приведенный выше код в основном не требует пояснений, поскольку мы уже обсудили большинство моментов. Мы вычисляем значение переменной hasVoted во время выполнения, проверяя, содержит ли список избирателей наш currentUserId.
n У нас также есть обратный вызов onVote, который в основном инициирует действие голосования. У нас есть это как TODO, потому что мы сделаем это в следующем разделе. 😉
Итак, мы создали пользовательский интерфейс опроса, методы опроса и все остальное, необходимое для рендеринга опроса, но подождите, мы что-то упустили? 🤔 (давай угадаю)

Мы еще не построили саму форму, с помощью которой мы будем создавать опрос. Давайте создадим очень простую форму.
Перейдем к файлу chat_screen.dart, там у нас есть метод _buildEnterMessageRow, который в основном строит самую нижнюю область экрана, где мы вводим сообщение и отправляем его. Давайте изменим его, чтобы в начале была дополнительная кнопка, которая поможет нам создавать опросы.
Widget _buildEnterMessageRow() {
  return SafeArea(
    child: Column(
      children: [
        _buildTypingIndicator(),
        Container(
          color: Colors.white,
          child: Row(
            mainAxisSize: MainAxisSize.max,
            mainAxisAlignment: MainAxisAlignment.spaceBetween,
            crossAxisAlignment: CrossAxisAlignment.center,
            children: <Widget>[
              // Our code here
              SizedBox(
                width: 50,
                height: 50,
                child: IconButton(
                  icon: const Icon(
                    Icons.poll,
                    color: Colors.blue,
                  ),
                  onPressed: () async {
                    final formKey = GlobalKey<FormState>();
                    final pollTitleController = TextEditingController();
                    final pollOption1Controller = TextEditingController();
                    final pollOption2Controller = TextEditingController();
                    final pollOption3Controller = TextEditingController();
                    final pollOption4Controller = TextEditingController();

                    await showModalBottomSheet(
                      isScrollControlled: true,
                      enableDrag: true,
                      shape: const RoundedRectangleBorder(
                        borderRadius: BorderRadius.vertical(
                          top: Radius.circular(20.0),
                        ),
                      ),
                      context: context,
                      backgroundColor: Colors.white,
                      builder: (context) {
                        return Padding(
                          padding: EdgeInsets.only(
                              bottom:
                                  MediaQuery.of(context).viewInsets.bottom),
                          child: Container(
                            padding: const EdgeInsets.all(20.0),
                            child: Form(
                              key: formKey,
                              child: SingleChildScrollView(
                                child: Column(
                                  children: [
                                    PollTextFieldRow(
                                      label: 'Enter Poll Title here',
                                      txtController: pollTitleController,
                                    ),
                                    PollTextFieldRow(
                                      label: 'Poll Option 1',
                                      txtController: pollOption1Controller,
                                    ),
                                    PollTextFieldRow(
                                      label: 'Poll Option 2',
                                      txtController: pollOption2Controller,
                                    ),
                                    PollTextFieldRow(
                                      label: 'Poll Option 3',
                                      txtController: pollOption3Controller,
                                    ),
                                    PollTextFieldRow(
                                      label: 'Poll Option 4',
                                      txtController: pollOption4Controller,
                                    ),
                                    ElevatedButton(
                                      onPressed: () {
                                        //TODO: Figure this out in next section
                                      },
                                      child: const Text('Create Poll'),
                                    ),
                                  ],
                                ),
                              ),
                            ),
                          ),
                        );
                      },
                    );
                  },
                ),
              ),
              SizedBox(
                width: 50,
                height: 50,
                child: IconButton(
                  // Some code present here
                ),
              ),
              Expanded(
                child: Container(
                  // Some code present here
                ),
              ),
              SizedBox(
                width: 50,
                height: 50,
                child: IconButton(
                  // Some code present here
                ),
              ),
            ],
          ),
        ),
      ],
    ),
  );
}
В приведенном выше коде мы только что добавили новый IconButton в качестве первого дочернего элемента строки сообщения Enter. Мы не копируем весь приведенный ниже код, чтобы фрагменты были короткими. Поэтому мы добавили комментарии. Вы можете получить полный код в прикрепленном репозитории.
Как вы могли догадаться, это простая форма с кнопкой для создания формы, и у нас снова есть TODO, которое фактически создаст опрос, что мы и собираемся выяснить в следующем разделе.
Все вместе
Мы прошли долгий путь. Если вы все еще здесь, поверьте нам, результат будет стоить затраченных усилий. 😌
В этом разделе мы собираемся подключить нашу логику к пользовательскому интерфейсу, чтобы это произошло. Мы также подключим наш poll_list_item в нужном месте. Итак, давайте запишем шаги, которые нам нужно предпринять, чтобы связать все воедино.
* Выясните два TODO из последнего раздела, которые на самом деле будут создавать и отправлять голоса в опрос. (Да, я помню TODO 😌). * Вставьте виджет PollListItem в ChatScreen.
Итак, давайте начнем с выяснения TODO, начиная с TODO в обратном вызове onPressed формы создания опроса.
n По сути, здесь мы хотим отправить сообщение в Quickblox с необходимыми параметрами, чтобы оно рассматривалось как сообщение о создании опроса.
// Create poll button code from chat_screen.dart
ElevatedButton(
  onPressed: () {
    //Cancel the Typing status timer
    TypingStatusManager.cancelTimer();

    //Add the CreatePoll event to the BLoC
    bloc?.events?.add(
      CreatePollMessageEvent(
        PollActionCreate.fromData(
          pollTitleController.text.trim(),
          [
            pollOption1Controller.text
                .trim(),
            pollOption2Controller.text
                .trim(),
            pollOption3Controller.text
                .trim(),
            pollOption4Controller.text
                .trim(),
          ],
        ),
      ),
    );

    //Pop the bottom modal sheet
    Navigator.of(context).pop();
  },
  child: const Text('Create Poll'),
),
Теперь давайте разберемся с другим TODO, чтобы проголосовать в опросе, Многие из вас уже догадались, И вы правы, Это так просто.
Polls(
  onVote: (pollOption, optionIndex) {
    // If the user has already voted, Don't do anything
    if (!hasVoted) {
    // Add the VoteToPoll event to the BLoC
      Provider.of<ChatScreenBloc>(context, listen: false)
          .events
          ?.add(
            VoteToPollEvent(
              PollActionVote(
                pollId: message.pollID,
                voteOptionId: pollOption.optionId!,
              ),
            ),
          );
    }
  },
  pollStyle: TextStyle(
    overflow: TextOverflow.ellipsis,
    fontSize: 15,
    color: message.isIncoming
        ? Colors.black87
        : Colors.white,
  ),
  backgroundColor:
      message.isIncoming ? Colors.white : Colors.blue,
  outlineColor: Colors.transparent,
  hasVoted: hasVoted,
  children: message.options.entries
      .map((e) => PollOption(
          optionId: e.key,
          option: e.value,
          value: votes
              .map((e) => e.choosenOption)
              .where((option) => option == e.key)
              .length
              .toDouble()))
      .toList(),
  pollTitle: Text(
    message.pollTitle,
  ),
),
Разве это не было просто? У нас уже все было готово, Просто добавили события с нужными данными и готово.
Двигаясь дальше, давайте подключим виджет PollListItem к ChatScreen. n На экране чата мы видим, что есть GroupedList, который группирует и отображает сообщения. Давайте изменим его itemBuilder, чтобы он обнаруживал и отображал PollMessage.
itemBuilder: (context, QBMessageWrapper message) {
  if (message is PollMessageCreate) {
      return ChatPollItem(
                message: message,
                key: ValueKey(
                    Key(
                       RandomUtil.getRandomString(10),
                    ),
                ),
      );
  }
  return GestureDetector(
      child: ChatListItem(
        Key(
          RandomUtil.getRandomString(10),
        ),
        message,
        _dialogType,
      ),
      onTapDown: (details) {
        tapPosition = details.globalPosition;
      },
      onLongPress: () {
      //More code present here
    }
  );
},
В приведенном выше коде мы в основном проверяем, является ли сообщение PollMessageCreate, и отображаем ChatPollItem после подсчета голосов для этого опроса. Давайте посмотрим, как выглядит окончательная версия:
Демо
На этом мы, наконец, закончили, и если вы правильно выполнили все шаги, у вас должны быть готовы рабочие функции опросов. В любом случае, если вы обнаружите какие-либо ошибки или упущенные фрагменты, вы всегда можете сопоставить свой код с полным исходным кодом, доступным в нашем репозитории.

Дальнейшие шаги
Эта статья была больше посвящена созданию функциональности опросов, а не полировке пользовательского интерфейса/UX и сосредоточению внимания на мельчайших деталях. Вот несколько вещей, которые, по нашему мнению, можно было бы улучшить.
- Улучшенная проверка форм и поддержка менее или более 4 вариантов.
- Выделение варианта, за который проголосовали.
- Расчет и выделение варианта с наибольшим количеством голосов.
- Отмена голосования.
- Добавление изображений или других медиафайлов в качестве вариантов опроса.
- Вы дайте нам знать. 😉
Ссылки
- https://docs.quickblox.com/docs
- https://github.com/PixelAppsMobile/quickblox-chat-fun-feature
- https://www.pixelapps.io/
Также опубликовано здесь.