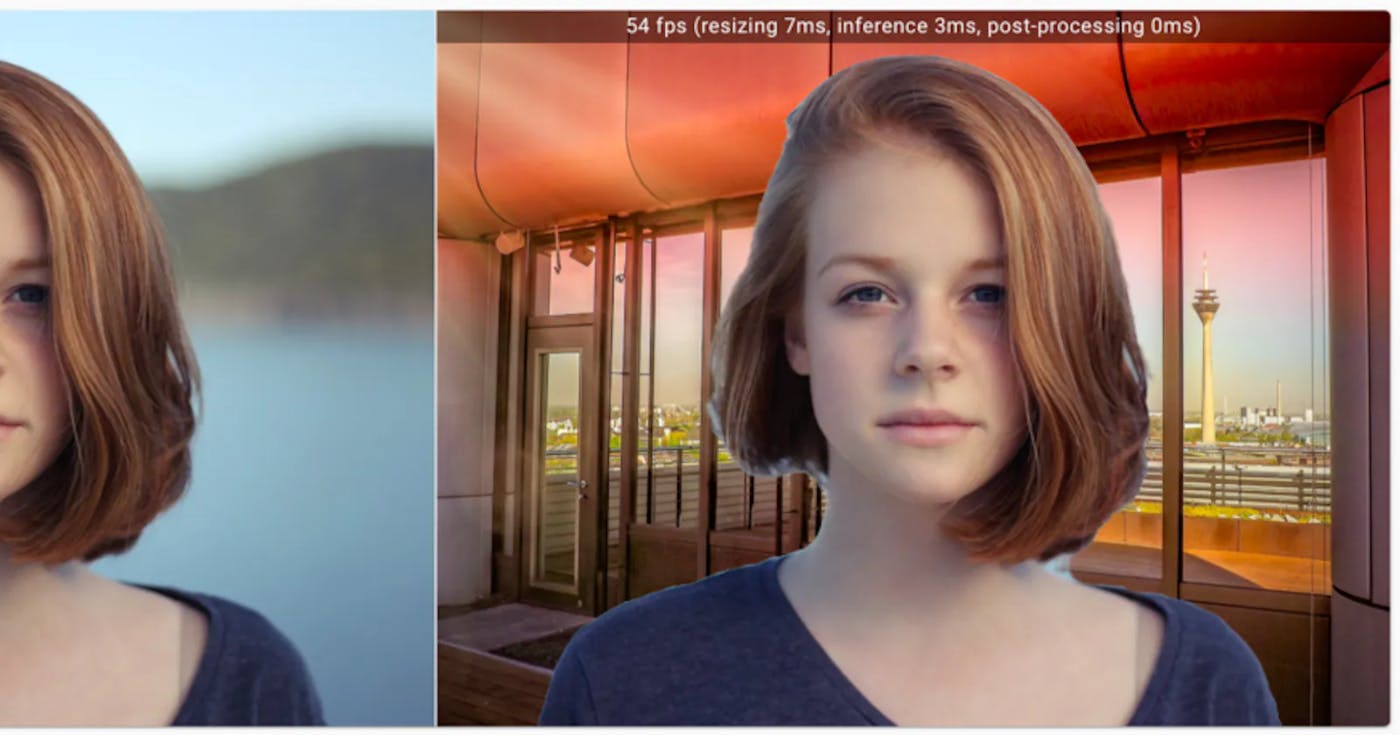
Создание виртуальных фонов в реальном времени с помощью BodyPix и веб-камеры в HTML и JavaScript
2 ноября 2023 г.Этот код HTML и JavaScript создает виртуальный фоновый эффект для изображения с веб-камеры на веб-странице. Он использует библиотеку BodyPix для отделения человека от фона в режиме реального времени и замены фона изображением.
Пользователи могут запускать и останавливать эффект виртуального фона с помощью кнопок. Код разработан с учетом адаптивного дизайна и позволяет пользователям выбирать между моделями сегментации MobileNetV1 и ResNet50. Это интересный и интерактивный способ улучшить видеозвонки с помощью виртуального фона.
<!DOCTYPE html>
<html lang="en">
<head>
    <meta charset="UTF-8">
    <meta name="viewport" content="width=device-width, initial-scale=1.0">
    <title>Virtual Background</title>
    <style>
        /* Add CSS styles for responsive design */
        body {
            margin: 0;
            padding: 0;
            display: flex;
            flex-direction: column;
            align-items: center;
            justify-content: center;
            height: 100vh;
            background-color: #f0f0f0;
        }

        #videoContainer {
            width: 100%;
            max-width: 600px; /* Adjust the maximum width as needed */
            position: relative;
        }

        video, canvas {
            width: 100%;
            height: auto;
            border-radius: 1rem;
        }

        img {
            max-width: 100%;
            height: auto;
        }

        button {
            margin: 10px;
            padding: 10px 20px;
            font-size: 18px;
            border-radius: 1rem;
            border: none;
            cursor: pointer;
            background-color: #e3e3e3;
        }

        button:hover {
            background-color: #1D2026;
            color: #FFF;
        }

        #errorText {
            width: 50%;
            color: red;
            font-weight: bold;
        }
    </style>

    <!-- Include the BodyPix library -->
    <script src="https://cdn.jsdelivr.net/npm/@tensorflow/tfjs/dist/tf.min.js"></script>
    <script src="https://cdn.jsdelivr.net/npm/@tensorflow-models/body-pix/dist/body-pix.min.js"></script>
</head>
<body>
    <!-- https://shubhampandey.in/removing-background-in-realtime/ -->
    <p id="errorText"></p>

    <!-- Create a container for the video and canvas elements -->
    <div id="videoContainer">
        <!-- Create a video element for the webcam feed -->
        <video id="videoElement" playsinline></video>

        <!-- Create a canvas element for the background -->
        <canvas id="backgroundCanvas" playsinline hidden></canvas>
    </div>

    <!-- Example of adding a background image (replace the img src attribute with your image file) -->
    <img id="yourBackgroundImage" src="https://i.postimg.cc/t9PJw5P7/forest.jpg" style="display: none;">

    <!-- Add buttons for user interaction -->
    <button id="startButton">Start Virtual Background</button>
    <button id="stopButton" style="display: none;">Stop Virtual Background</button>

    <script>
        // Initialize variables
        let isVirtual = false;

        // DOM elements
        const videoContainer = document.getElementById('videoContainer');
        const videoElement = document.getElementById('videoElement');
        const canvasElement = document.getElementById('backgroundCanvas');
        const backgroundImage = document.getElementById('yourBackgroundImage');
        const ctx = canvasElement.getContext('2d');
        const startButton = document.getElementById('startButton');
        const stopButton = document.getElementById('stopButton');
        const errorText = document.getElementById('errorText');

         // MobileNetV1 or ResNet50
        const BodyPixModel = 'MobileNetV1';

        async function startWebCamStream() {
            try {
                // Start the webcam stream
                const stream = await navigator.mediaDevices.getUserMedia({ video: true });
                videoElement.srcObject = stream;

                // Wait for the video to play
                await videoElement.play();
            } catch (error) {
                displayError(error)
            }
        }

        // Function to start the virtual background
        async function startVirtualBackground() {
            try {
                // Set canvas dimensions to match video dimensions
                canvasElement.width = videoElement.videoWidth;
                canvasElement.height = videoElement.videoHeight;

                // Load the BodyPix model:
                let net = null;

                switch (BodyPixModel) {
                    case 'MobileNetV1':
                        /*
                            This is a lightweight architecture that is suitable for real-time applications and has lower computational requirements.
                            It provides good performance for most use cases.
                        */
                        net = await bodyPix.load({
                            architecture: 'MobileNetV1',
                            outputStride: 16, // Output stride (16 or 32). 16 is faster, 32 is more accurate.
                            multiplier: 0.75, // The model's depth multiplier. Options: 0.50, 0.75, or 1.0.
                            quantBytes: 2, // The number of bytes to use for quantization (4 or 2).
                        });
                        break;
                    case 'ResNet50':
                        /*
                            This is a deeper and more accurate architecture compared to MobileNetV1.
                            It may provide better segmentation accuracy, but it requires more computational resources and can be slower.
                        */
                        net = await bodyPix.load({
                            architecture: 'ResNet50',
                            outputStride: 16, // Output stride (16 or 32). 16 is faster, 32 is more accurate.
                            quantBytes: 4, // The number of bytes to use for quantization (4 or 2).
                        });
                        break;
                    default:
                        break;
                }

                // Start the virtual background loop
                isVirtual = true;
                videoElement.hidden = true;
                canvasElement.hidden = false;
                display(canvasElement, 'block');

                // Show the stop button and hide the start button
                startButton.style.display = 'none';
                stopButton.style.display = 'block';

                async function updateCanvas() {
                    if (isVirtual) {
                        // 1. Segmentation Calculation
                        const segmentation = await net.segmentPerson(videoElement, {
                            flipHorizontal: false, // Whether to flip the input video horizontally
                            internalResolution: 'medium', // The resolution for internal processing (options: 'low', 'medium', 'high')
                            segmentationThreshold: 0.7, // Segmentation confidence threshold (0.0 - 1.0)
                            maxDetections: 10, // Maximum number of detections to return
                            scoreThreshold: 0.2, // Confidence score threshold for detections (0.0 - 1.0)
                            nmsRadius: 20, // Non-Maximum Suppression (NMS) radius for de-duplication
                            minKeypointScore: 0.3, // Minimum keypoint detection score (0.0 - 1.0)
                            refineSteps: 10, // Number of refinement steps for segmentation
                        });

                        // 2. Creating a Background Mask
                        const background = { r: 0, g: 0, b: 0, a: 0 };
                        const mask = bodyPix.toMask(segmentation, background, { r: 0, g: 0, b: 0, a: 255 });

                        if (mask) {
                            ctx.putImageData(mask, 0, 0);
                            ctx.globalCompositeOperation = 'source-in';

                            // 3. Drawing the Background
                            if (backgroundImage.complete) {
                                ctx.drawImage(backgroundImage, 0, 0, canvasElement.width, canvasElement.height);
                            } else {
                                // If the image is not loaded yet, wait for it to load and then draw
                                backgroundImage.onload = () => {
                                    ctx.drawImage(backgroundImage, 0, 0, canvasElement.width, canvasElement.height);
                                };
                            }

                            // Draw the mask (segmentation)
                            ctx.globalCompositeOperation = 'destination-over';
                            ctx.drawImage(videoElement, 0, 0, canvasElement.width, canvasElement.height);
                            ctx.globalCompositeOperation = 'source-over';

                            // Add a delay to control the frame rate (adjust as needed) less CPU intensive
                            // await new Promise((resolve) => setTimeout(resolve, 100));

                            // Continue updating the canvas
                            requestAnimationFrame(updateCanvas);
                        }
                    }
                }
                // Start update canvas
                updateCanvas();
            } catch (error) {
                stopVirtualBackground();
                displayError(error);
            }
        }

        // Function to stop the virtual background
        function stopVirtualBackground() {
            isVirtual = false;
            videoElement.hidden = false;
            canvasElement.hidden = true;
            display(canvasElement, 'none');

            // Hide the stop button and show the start button
            startButton.style.display = 'block';
            stopButton.style.display = 'none';
        }

        // Helper function to set the display style of an element
        function display(element, style) {
            element.style.display = style;
        }

        // Helper function to display errors
        function displayError(error){
            console.error(error);
            // Display error message in the <p> element
            errorText.textContent = 'An error occurred: ' + error.message;
        }

        // Add click event listeners to the buttons
        startButton.addEventListener('click', startVirtualBackground);
        stopButton.addEventListener('click', stopVirtualBackground);

        // Start video stream
        startWebCamStream();
    </script>
</body>
</html>
Оригинал

