
Как отслеживать ежедневные вызовы LeetCode с помощью Todoist и Cloudflare Worker
13 февраля 2022 г.If you have ever been on a job hunt for a software developer position, you would have come across the so-called LeetCode style interviews.
Если вы когда-либо занимались поиском работы на должность разработчика программного обеспечения, вы наверняка сталкивались с так называемыми собеседованиями в стиле LeetCode.
Despite the fact that most of us don’t have to invert a Binary Tree at our actual job, that is how most coding/technical interviews are conducted at big tech companies like Google and Microsoft. Yes, even at the likes of unicorns (except for Stripe, because they are cool) and startups.
Несмотря на то, что большинству из нас не нужно инвертировать двоичное дерево на нашей реальной работе, именно так проходит большинство собеседований по программированию/техническим вопросам. проводится в крупных технологических компаниях, таких как Google и Microsoft. Да, даже у таких как единороги (кроме Stripe, потому что они крутые) и стартапах.
In this post, I’ll be writing about the thought process of how I came about building and deploying a very simple JavaScript app for free with Cloudflare Worker. If you simply want to deploy and use the app on your own, check out the repository here.
В этом посте я буду писать о том, как я пришел к созданию и бесплатному развертыванию очень простого приложения JavaScript с помощью [Cloudflare Worker] (https://workers.cloudflare.com/). Если вы просто хотите развернуть и использовать приложение самостоятельно, загляните в репозиторий [здесь] (https://github.com/ngshiheng/todoleet).
TL;DR
TL;DR
- How to get the Daily LeetCoding Challenge question using LeetCode API
- Как получить вопрос Daily LeetCoding Challenge с помощью LeetCode API
- Creating a Todoist task using Todoist API
- Создание задачи Todoist с помощью Todoist API
- Schedule our app to run daily using Cloudflare Worker ScheduledEvent API
- Запланируйте ежедневное выполнение нашего приложения с помощью Cloudflare Worker ScheduledEvent API.
- How to test a Cloudflare Worker Cron trigger locally with Miniflare
- Как протестировать триггер Cloudflare Worker Cron локально с помощью Miniflare
Problem Statement
Постановка задачи
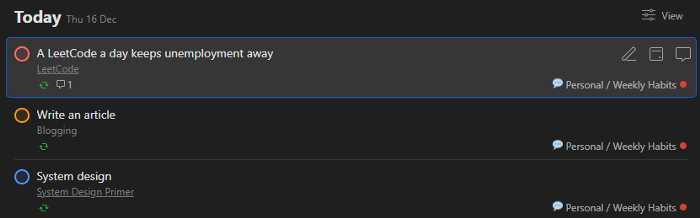
For a year now, I have been trying to make it a habit to solve the Daily LeetCoding Challenge (which I’m still struggling with). As I am using Todoist as my main productivity tool of choice, I have a daily task that looks just like this:
Вот уже год я пытаюсь сделать привычкой решать Daily LeetCoding Challenge (с которым я все еще борюсь). Поскольку я использую Todoist в качестве основного инструмента повышения производительности, у меня есть ежедневная задача, которая выглядит примерно так:
As a lazy person, having to check leetcode.com every time I want to practice is too much of a hassle. So then I thought, why not just sync the Daily LeetCoding Challenge to my Todoist every day?
Мне как ленивому человеку приходится проверять leetcode.com каждый раз, когда я хочу попрактиковаться, слишком много хлопот. Тогда я подумал, почему бы просто не синхронизировать Daily LeetCoding Challenge с моим Todoist каждый день?
Requirements
Требования
Let’s start by defining what I want the app to do:
Давайте начнем с определения того, что я хочу, чтобы приложение делало:
- Get Daily LeetCoding Challenge question
- Получить вопрос ежедневного конкурса LeetCoding
- Ability to create a new task on my Todoist account
- Возможность создать новую задачу в моей учетной записи Todoist
- Sync new Daily LeetCoding Challenge question on time
- Синхронизируйте новый вопрос Daily LeetCoding Challenge вовремя
- The app has to sync on time for free every day
- Приложение должно синхронизироваться вовремя бесплатно каждый день
Let’s start!
Давайте начнем!
LeetCode API
API LeetCode
Like any sane person would do, the first thing I did was to do some research. By research, I meant I started to Google for information.
Как и любой здравомыслящий человек, первым делом я провел небольшое исследование. Под исследованием я имел в виду, что начал искать информацию в Google.
The first thing I did was to immediately Google for “leetcode API”, looking for the official API documentation.
Первое, что я сделал, это немедленно погуглил «leetcode API» в поисках официальной документации API.
Official API documentation
Официальная документация по API
To my surprise, there wasn’t any official LeetCode API documentation available. While there is a couple of unofficial LeetCode API repositories on GitHub, I would rather not use any unofficial API due to reliability concerns (poorly maintained, outdated, etc.).
К моему удивлению, официальной документации LeetCode API не было. Хотя на GitHub есть несколько неофициальных репозиториев API LeetCode, я бы предпочел не использовать какой-либо неофициальный API из-за проблем с надежностью (плохо поддерживается, устарел и т. д.).
The Good Ol’ DevTool inspection
Инспекция старого доброго DevTool
The second thing that immediately came to my mind was to inspect the network request being made while visiting the site https://leetcode.com/problemset/all/.
Второе, что сразу пришло в голову, это проверить сетевой запрос, который делается при посещении сайта https://leetcode.com/problemset/all/.
With this, I was able to figure out the exact API called to query for the Daily LeetCoding Challenge — done.
Благодаря этому я смог определить точный API, вызываемый для запроса Daily LeetCoding Challenge — готово.
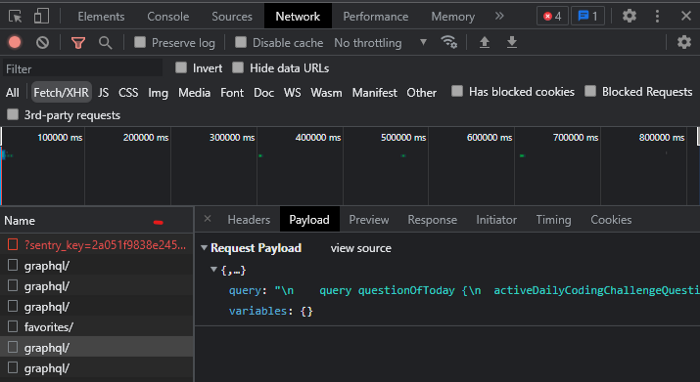

Here’s the GraphQL request body:
Вот тело запроса GraphQL:
HTTP POST to https://leetcode.com/graphql
HTTP POST на https://leetcode.com/graphql
query questionOfToday {
запрос questionOfToday {
activeDailyCodingChallengeQuestion {
activeDailyCodingChallengeQuestion {
date
Дата
userStatus
статус пользователя
link
ссылка на сайт
question {
вопрос {
acRate
acRate
difficulty
трудность
freqBar
freqBar
frontendQuestionId: questionFrontendId
внешний интерфейсQuestionId: вопросFrontendId
isFavor
isFavor
paidOnly: isPaidOnly
платный только: isPaidOnly
status
статус
title
заглавие
titleSlug
titleSlug
hasVideoSolution
hasVideoSolution
hasSolution
hasSolution
topicTags {
темаТеги {
name
название
id
я бы
slug
слизняк
}
}
}
You can use the curl command below to try it out yourself:
Вы можете использовать приведенную ниже команду curl, чтобы попробовать это самостоятельно:
```bash
``` ударить
curl --request POST \
curl --запрос POST \
--url https://leetcode.com/graphql \
--url https://leetcode.com/graphql \
--header 'Content-Type: application/json' \
--header 'Тип содержимого: приложение/json' \
--data '{"query":"query questionOfToday {
\tactiveDailyCodingChallengeQuestion {
\t\tdate
\t\tuserStatus
\t\tlink
\t\tquestion {
\t\t\tacRate
\t\t\tdifficulty
\t\t\tfreqBar
\t\t\tfrontendQuestionId: questionFrontendId
\t\t\tisFavor
\t\t\tpaidOnly: isPaidOnly
\t\t\tstatus
\t\t\ttitle
\t\t\ttitleSlug
\t\t\thasVideoSolution
\t\t\thasSolution
\t\t\ttopicTags {
\t\t\t\tname
\t\t\t\tid
\t\t\t\tslug
\t\t\t}
\t\t}
\t}
}
","operationName":"questionOfToday"}'
--data '{"query":"query questionOfToday {
\tactiveDailyCodingChallengeQuestion {
\t\tdate
\t\tuserStatus
\t\tlink
\t\tquestion {
\t\t\tacRate
\t\t\tdifficulty
\t\t\tfreqBar
\t\t\tfrontendQuestionId: questionFrontendId
\t\t\tisFavor
\t \t\tpaidOnly: isPaidOnly
\t\t\tstatus
\t\t\ttitle
\t\t\ttitleSlug
\t\t\thasVideoSolution
\t\t\ thasSolution
\t\t\ttopicTags {
\t\t\t\tname
\t\t\t\tid
\t\t\t\tslug
\t\ t\t}
\t\t}
\t}
}
","operationName":"questionOfToday"}'
Enough talking, let’s start to write some code that does exactly what we went through:
Хватит говорить, давайте начнем писать код, который делает именно то, через что мы прошли:
```javascript
```javascript
// Just some constants
// Просто некоторые константы
const LEETCODE_API_ENDPOINT = 'https://leetcode.com/graphql'
const LEETCODE_API_ENDPOINT = 'https://leetcode.com/graphql'
const DAILY_CODING_CHALLENGE_QUERY = `
константа DAILY_CODING_CHALLENGE_QUERY = `
query questionOfToday {
запрос questionOfToday {
activeDailyCodingChallengeQuestion {
activeDailyCodingChallengeQuestion {
date
Дата
userStatus
статус пользователя
link
ссылка на сайт
question {
вопрос {
acRate
acRate
difficulty
трудность
freqBar
freqBar
frontendQuestionId: questionFrontendId
внешний интерфейсQuestionId: вопросFrontendId
isFavor
isFavor
paidOnly: isPaidOnly
платный только: isPaidOnly
status
статус
title
заглавие
titleSlug
titleSlug
hasVideoSolution
hasVideoSolution
hasSolution
hasSolution
topicTags {
темаТеги {
name
название
id
я бы
slug
слизняк
}
}
}
// We can pass the JSON response as an object to our createTodoistTask later.
// Мы можем передать ответ JSON как объект нашей createTodoistTask позже.
const fetchDailyCodingChallenge = async () => {
const fetchDailyCodingChallenge = async () => {
console.log(`Fetching daily coding challenge from LeetCode API.`)
console.log(Получение ежедневной задачи по программированию из LeetCode API.)
const init = {
константа инициализации = {
method: 'POST',
метод: «ПОСТ»,
headers: { 'Content-Type': 'application/json' },
заголовки: {'Content-Type': 'application/json'},
body: JSON.stringify({ query: DAILY_CODING_CHALLENGE_QUERY }),
тело: JSON.stringify({запрос: DAILY_CODING_CHALLENGE_QUERY}),
}
const response = await fetch(LEETCODE_API_ENDPOINT, init)
постоянный ответ = ожидание выборки (LEETCODE_API_ENDPOINT, инициализация)
return response.json()
вернуть ответ.json()
Task “Get Daily LeetCoding Challenge question” — checked.
Задание «Получить вопрос Daily LeetCoding Challenge» — проверено.
Todoist API
API Тодоиста
Like what we did in the previous step, I was able to find the official API documentation for Todoist. Typically, the first section that I always look for in API documentation is the Authorization section, especially when you want to perform create/update/delete operations on an app.
Как и в предыдущем шаге, я смог найти [официальную документацию по API] (https://developer.todoist.com/rest/v1/#overview) для Todoist. Как правило, первый раздел, который я всегда ищу в документации API, — это раздел [Авторизация] (https://developer.todoist.com/rest/v1/#authorization), особенно когда вы хотите выполнять операции создания/обновления/удаления. в приложении.
In short, authorization was pretty straightforward for Todoist:
Короче говоря, авторизация для Todoist была довольно простой:
- Whenever you make a request, attach
Authorization: Bearer xxx-your-todoist-api-token-xxxto your HTTP request header
- Всякий раз, когда вы делаете запрос, присоединяйте «Авторизация: Bearer xxx-your-todoist-api-token-xxx» к заголовку вашего HTTP-запроса.
Here’s an example of what the curl command to create a new task on Todoist would look like:
Вот пример того, как будет выглядеть команда curl для создания новой задачи в Todoist:
```sh
``ш
curl --request POST \
curl --запрос POST \
--url 'https://api.todoist.com/rest/v1/tasks?=' \
--url 'https://api.todoist.com/rest/v1/tasks?=' \
--header 'Authorization: Bearer xxx-your-todoist-api-token-xxx' \
--header 'Авторизация: Bearer xxx-your-todoist-api-token-xxx' \
--header 'Content-Type: application/json' \
--header 'Тип содержимого: приложение/json' \
--data '{
--данные '{
"content": "Buy a jar of peanut butter",
"content": "Купите банку арахисового масла",
"due_string": "Today"
"due_string": "Сегодня"
Code
Код
Writing a function that does what we said is relatively easy, it looks something like this:
Написать функцию, которая делает то, что мы сказали, относительно легко, она выглядит примерно так:
```javascript
```javascript
const TODOIST_API_ENDPOINT = "https://api.todoist.com/rest/v1";
const TODOIST_API_ENDPOINT = "https://api.todoist.com/rest/v1";
// Passing in the question object from fetchDailyCodingChallenge function
// Передача объекта вопроса из функции fetchDailyCodingChallenge
const createTodoistTask = async (question) => {
const createTodoistTask = async (вопрос) => {
const questionInfo = question.data.activeDailyCodingChallengeQuestion;
const questionInfo = question.data.activeDailyCodingChallengeQuestion;
const questionTitle = questionInfo.question.title;
const questionTitle = questionInfo.question.title;
const questionDifficulty = questionInfo.question.difficulty;
const questionDifficulty = questionInfo.question.difficulty;
const questionLink = `https://leetcode.com${questionInfo.link}`;
const questionLink = https://leetcode.com${questionInfo.link};
console.log(`Creating Todoist task with title ${questionTitle}.`);
console.log(Создание задачи Todoist с заголовком ${questionTitle}.);
const body = {
константное тело = {
content: `[${questionTitle}](${questionLink})`,
содержание: [${questionTitle}](${questionLink}),
description: `Difficulty: ${questionDifficulty}`,
описание: Сложность: ${questionDifficulty},
due_string: "Today",
due_string: "Сегодня",
priority: 4,
приоритет: 4,
};
const init = {
константа инициализации = {
method: "POST",
метод: "ПОСТ",
body: JSON.stringify(body),
тело: JSON.stringify(тело),
headers: {
заголовки: {
"Content-Type": "application/json",
"Тип контента": "приложение/json",
Authorization: `Bearer ${TODOIST_API_TOKEN}`, // Set at environment variable
Авторизация: Bearer ${TODOIST_API_TOKEN}, // Установить в переменной окружения
},
};
const response = await fetch(`${TODOIST_API_ENDPOINT}/tasks`, init);
const response = await fetch(${TODOIST_API_ENDPOINT}/tasks, init);
return response.json();
вернуть ответ.json();
Task “Create a new task on my Todoist account” — done.
Задача «Создать новую задачу в моем аккаунте Todoist» — выполнена.
Cloudflare Worker
Работник Cloudflare
And we’re down to our one final task — running/automating the 2 tasks above every day, for free.
И мы подошли к нашей последней задаче — выполнять/автоматизировать 2 задачи выше каждый день бесплатно.
The first thing that came to my mind was Cron job. So, I immediately started looking for free solutions on the Internet. After spending a couple of hours doing some homework, I came across Cloudflare Worker, and I figured to give them a try.
Первое, что пришло мне в голову, — работа Cron. Итак, я сразу начал искать бесплатные решения в Интернете. Потратив пару часов на выполнение домашней работы, я наткнулся на Cloudflare Worker и решил попробовать.
It runs on V8 JavaScript, not Node.js
Он работает на JavaScript V8, а не на Node.js
This is probably one of the most common misconceptions about Cloudflare Worker. As the worker’s environment is not in Node.js, a lot of packages (e.g. npm install some-node-package) that are running on Node.js would simply not work.
Вероятно, это одно из самых распространенных заблуждений [о Cloudflare Worker] (https://blog.cloudflare.com/introduction-cloudflare-workers/). Поскольку рабочая среда находится не в Node.js, многие пакеты (например, «npm install some-node-package»), работающие на Node.js, просто не будут работать.
Tip: Check out the supported packages and libraries here.
Совет: ознакомьтесь с поддерживаемыми пакетами и библиотеками здесь.
Lucky for us, we only need to use the JavaScript built-in fetch API.
К счастью для нас, нам нужно использовать только встроенный в JavaScript API fetch.
More code
Еще код
Starting a Cloudflare Worker project is dead simple (reference), basically:
Запустить проект Cloudflare Worker очень просто (ссылка), в основном:
- Install the Wrangler CLI using
npm install -g @cloudflare/wrangler
- Установите интерфейс командной строки Wrangler с помощью npm install -g @cloudflare/wrangler.
- The entry point is
addEventListenerfunction. For our use case, we will be using the ScheduledEvent API where we simply have to change our event from"fetch"to"scheduled"
- Точка входа — функция addEventListener. В нашем случае мы будем использовать API ScheduledEvent, где нам просто нужно изменить наше событие с
"fetch"на"запланировано"
Let’s stitch everything together:
Сшиваем все вместе:
```javascript
```javascript
// Move the constants to const.js
// Перемещаем константы в const.js
const syncLeetCodeCodingChallenge = async (event) => {
const syncLeetCodeCodingChallenge = async (событие) => {
const question = await fetchDailyCodingChallenge();
постоянный вопрос = ожидание fetchDailyCodingChallenge();
await createTodoistTask(question);
ожидание созданияTodoistTask(вопрос);
addEventListener("scheduled", (event) => {
addEventListener("запланировано", (событие) => {
// Change 'fetch' to 'scheduled'
// Изменить «выборку» на «запланировано»
event.waitUntil(syncLeetCodeCodingChallenge(event));
event.waitUntil (syncLeetCodeCodingChallenge (событие));
Next, we would simply need to modify the wrangler.toml as below:
Далее нам просто нужно изменить wrangler.toml, как показано ниже:
```toml
``` томл
name = "
name = "<имя-вашего-проекта>"
type = "webpack"
тип = "веб-пакет"
[triggers]
[триггеры]
crons = ["1 0 * "]
крон = ["1 0 * "]
With the setting above, the worker will run every day at 00:01 UTC and sync the Daily LeetCoding Challenge to your Todoist.
С указанными выше настройками воркер будет запускаться каждый день в 00:01 UTC и синхронизировать Daily LeetCoding Challenge с вашим Todoist.
That’s all! Moving on to testing.
Это все! Переходим к тестированию.
How to test Cloudflare workers locally
Как протестировать воркеры Cloudflare локально
In order to try out the Cron triggers locally, we would need to install the Miniflare CLI. After installation, you may run your worker using:
Чтобы опробовать триггеры Cron локально, нам потребуется установить [Miniflare CLI] (https://miniflare.dev/cli.html). После установки вы можете запустить своего воркера, используя:
```sh
``ш
At terminal 1
На терминале 1
miniflare
минивспышка
At terminal 2
На терминале 2
curl "http://localhost:8787/.mf/scheduled"
завиток "http://localhost:8787/.mf/scheduled"
If you see a new task is created on your Todoist, you have made it!
Если вы видите, что в вашем Todoist создается новая задача, вы ее выполнили!
Deployment
Развертывание
No side project is ever done without hosting it.
Ни один сторонний проект не обходится без хостинга.
To deploy the app on your own immediately, check out the project repository and use the “Deploy with Workers” button. If you’re interested in the know-how:
Чтобы немедленно развернуть приложение самостоятельно, зайдите в репозиторий проекта и используйте "Развертывание с помощью Workers". Если вас интересует ноу-хау:
- Create a Cloudflare account.
- Создайте учетную запись Cloudflare.
- Add
TODOIST_API_TOKENusingwrangler secret put TODOIST_API_TOKEN. You may find the newly added secret under 'Cloudflare Worker' → 'Settings' → 'Variables'. You can get your Todoist API token here.
- Добавьте
TODOIST_API_TOKEN, используясекрет wrangler put TODOIST_API_TOKEN. Вы можете найти новый секрет в разделе «Cloudflare Worker» → «Настройки» → «Переменные». Вы можете получить токен Todoist API здесь.
- Optional: This is only required for Wrangler actions. Add
CF_API_TOKENinto your GitHub repository secrets. You can create your API token from https://dash.cloudflare.com/profile/api-tokens using theEdit Cloudflare Workerstemplate.
- Необязательно: это требуется только для действий Wrangler. Добавьте
CF_API_TOKENв секреты репозитория GitHub. Вы можете создать свой токен API из https://dash.cloudflare.com/profile/api-tokens, используя шаблон «Редактировать Cloudflare Workers».
- Finally, to publish any new changes to your Cloudflare Worker, run
wrangler publish
- Наконец, чтобы опубликовать любые новые изменения в Cloudflare Worker, запустите
wrangler publish
And we are finally done!
И мы наконец закончили!
Closing Thoughts
Заключительные мысли
Finally, there’s a lot more that we could have done, e.g.:
Наконец, мы могли бы сделать гораздо больше, например:
- Handling unanswered questions from previous days
- Обработка оставшихся без ответа вопросов из предыдущих дней
- Making the app configurable/customizable for users
- Делаем приложение настраиваемым/настраиваемым для пользователей
- Add tags to our task
- Добавляем теги к нашей задаче
- Allowing users to create a random LeetCode question as a task based on question tag
- Разрешение пользователям создавать случайный вопрос LeetCode в качестве задачи на основе тега вопроса
I’m going to leave these features out for another day.
Я собираюсь оставить эти функции на другой день.
While there is a lot of hate on coding interviews as such, I personally look at it this way — by learning some brain teasers, you probably get paid a lot more, so why not? It is really a matter of perspective. If you happen to enjoy doing them, that is even better.
Хотя собеседования по программированию вызывают много ненависти как таковые, лично я смотрю на это так: за изучение некоторых головоломок вам, вероятно, будут платить намного больше, так почему бы и нет? Это действительно вопрос перспективы. Если вам нравится делать их, это еще лучше.
Personally, I don’t find as much joy doing LeetCode questions. Rather, I work on LeetCode problems as if I am lifting weights at the gym. While I don’t enjoy lifting weights, I do like reaping the benefits of it.
Лично я не получаю столько удовольствия, отвечая на вопросы LeetCode. Скорее, я работаю над задачами LeetCode, как если бы я поднимал тяжести в спортзале. Хотя мне не нравится поднимать тяжести, мне нравится пожинать плоды этого.
That’s all for today. Let me know what are you building with Cloudflare Worker!
Это все на сегодня. Дайте мне знать, что вы строите с помощью Cloudflare Worker!
Оригинал
🔥 Популярное на этой неделе
-
8 проектов с открытым исходным кодом, которые помогут вашему бизнесу работать эффективно
6 апреля 2022 г. -
Новые фильмы 2023 года: самые крупные предстоящие релизы скоро появятся в кинотеатрах
7 декабря 2022 г. -
Новые фильмы Netflix 2023 года: самые большие оригинальные фильмы, выходящие на стример
28 декабря 2022 г. -
Marvel’s Wolverine: все, что мы знаем об эксклюзиве для PS5 на данный момент
31 марта 2023 г. -
Новое обновление Xbox Series X только что вышло и может сэкономить вам деньги
12 января 2023 г.
⭐ Самое популярное
-
Marvel’s Wolverine: все, что мы знаем об эксклюзиве для PS5 на данный момент
31 марта 2023 г. -
Новые фильмы 2023 года: самые крупные предстоящие релизы скоро появятся в кинотеатрах
7 декабря 2022 г. -
8 проектов с открытым исходным кодом, которые помогут вашему бизнесу работать эффективно
6 апреля 2022 г. -
Новые фильмы Netflix 2023 года: самые большие оригинальные фильмы, выходящие на стример
28 декабря 2022 г. -
Новое обновление Xbox Series X только что вышло и может сэкономить вам деньги
12 января 2023 г.
Categories
- Технологии и IT (27442)
- Игры, развлечения и хобби (4775)
- Искусственный интеллект и будущее (294)
- Бизнес и предпринимательство (273)
- Общество и культура (244)
- Дизайн и креатив (202)
- Экономика и финансы (107)
- Социальные медиа и интернет-культура (107)
- Наука и исследования (74)
- Спорт и здоровье (55)
- Психология и саморазвитие (50)
- Образование и обучение (20)
- Маркетинг и реклама (17)
- Путешествия и lifestyle (6)